Pages

Friday, June 29, 2012

Bow pillow

Last night I finished a super cute pillow cover.  It was super easy to make, thanks to the tutorial by {E Tells Tales}.  I made mine a little smaller though, so that it would be tighter around the pillow.
You may also notice a pretty funky fabric in the background.  I'm super excited to show off that project. What a before/after that one is!

Monday, June 25, 2012

Put a bird on it!

This morning I headed down to the HD to get some board to back the shelves.  Just for the record, spray painting in intense wind makes your can run out WAY faster, and gets you painted arms.
I painted the board all white, but I just wasn't feeling it. I came inside and asked Sam what I should do, and he said, "put a bird on it!"


It was half a joke, half serious, because my brilliant husband knows I actually think birds on things are great.

I penciled out a design and then painted it in with some black paint.


I might have some scrapbooking and sewing skills, but I'm not too hot at drawing, so I'm pretty proud of myself.


Not too bad, if I do say so myself. I think the backing is kind of fun and makes the sort of hoboish shelves look a little more like it's supposed to be this way.

They are super heavy though. I'm going to need some strong brothers to come move it into the house for me!

Wood= $9
Paint/polyurethane= $11
Backing= $8
Tools= FREE (thanks Poppa White!)
Total cost= $28

Friday, June 22, 2012

Child's Play.

Today I built shelves while the boys built a garage. I feel like I'm playing with play-doh while the big boys do the real work!

Thursday, June 21, 2012

Piles of wood.

The very old wood that I got a bit ago is finally being put to use! All day I've been sawing, pulling out metal, and getting cool tan lines from work gloves.  Tonight I'll wash it down, then tomorrow I'll seal it and hopefully get it all built! It's about time-- our books are pretty much strewn across our living room and I need a place to put them!
I'm thinking this project will either look super awesome or extremely horrible.

Wednesday, June 20, 2012

My first quilt

This is the first quilt I've ever done by myself from start to finish!

It's not perfect by any means, but I really like the {pattern} and the {fabric}.
I did a zig zag stitch around each big and small square, and then did free motion quilting in the white space.  The free motion is still taking some getting used to... So it doesn't look very uniform, but that's ok.
I actually have several quilts almost done, but the finishing parts intimidate me.  I don't want to mess them up! But I guess there's no point in just having quilt sammiches sitting around either.

Thursday, June 14, 2012

Whoopsies.

Do you suppose painting my nails (on purpose) this morning was worth it:?

When you know what the perfect thing would be, you HAVE to find it!

I've been going crazy trying to find this one specific fabric for a quilt I'm doing. It's DANG cute and my favourite one in the collect, but apparently I was in dream land when they actually came out last year, so it's SUPER hard to find. Web searches mostly came up with people on forums asking where on earth to find it. I was ready to throw in the towel and find a replacement, but I JUST found a little etsy shop that had not only THE fabric, but a few of the others that I was hoping to find too.
Jackpot!
Sure, you might get stuff on sale if you wait-- or you might not be able to get it at all! It's a gamble!
It was the second one from the top, in case you're wondering.

Wednesday, June 13, 2012

Tuesday, June 12, 2012

White antiqued coffee table

The {coffee table} has been painted, dried, and placed in our living room! I really like how it turned out.  I think the antiquing really adds some character and depth to the piece.

Not too bad, eh?

Sunday, June 10, 2012

Glazing/antiquing

Glazing your furniture can really add definition and character to the appearance.  The {coffee table} I just got has such great details that I really wanted to emphasize them.
I use {Valspar Antiquing Glaze}, which is pre-tinted, but you can also buy clear glazes and then get the worker to add whatever colour you want.  You need hardly any to do a piece of furniture, so I would recommend getting the smallest size you can. 
Once your piece is primed and painted, you can start glazing away.  I don't like a super heavy colour, so I mix about 1/4c glaze with 2T water to thin it out and make it easier to manipulate.  With the cheapest brush you can find, just brush on the glaze in a smallish section. I like to work in sections by board or length of trim to prevent dark edges drying where you don't want them to.  Make sure you go to town with getting the glaze into all of the cracks and ridges. Right away, wipe off the glaze with a wet paper towel to get the bulk of it off. Then take a wet rag and wipe off the remaining bits that you don't want.  Then touch it up with a dry rag, getting rid of leftover water and glaze. You can leave as much glaze on as you want, or wipe off everything you can't get to.

Easy, eh? 

Friday, June 8, 2012

One man's pile of trash is my treasure.

For my {shelving project} I found that new wood at hardware places was just way too expensive for my taste. I started looking at Craiglist, and I found a guy selling "antique wood" (ie: old and probably gross).  It was part of an old fence he had torn down.  So today I buckled up and headed down south to Santaquin.  Santaquin is a pretty small town comprised mainly of hunters and/or farmers. I was in town heading to get the wood when I realized that I didn't have work gloves. Anticipating that there would be a lot of splinters, nails, and crud I stopped at the local Dollar Store to grab some. When I came out, this fellow was in the parking lot and asked me if I wanted a ride:

Welcome to Santaquin.


I got to the house where I was directed to several piles of wood around the yard that had already been picked over twice. It took a whole lot of digging around, but I think I got enough of what I wanted. I'm apprehensive about how this is going to turn out, but if what I envisioned works, it will be awesome!


Thursday, June 7, 2012

Coffee table in the works

I found a great, super inexpensive coffee table this week!
Isn't it lovely? I'm excited!

Wednesday, June 6, 2012

The first chair

I found this chair on craigslist for only $10. The structure is absolutely fantastic and it's super comfortable.  The fabric on the arms and cushion is ripped, and I don't like the colour or pattern, so that means reupholster time!

So many staples!  I got antsy to start and we don't have needle-nose pliers, so I got a lot of the fabric off (with much difficulty) with my tiny scrapbooking hammer, haha. I'm think I'll invest in some pliers.

Only minor amounts of blood has been drawn from the evil staples.

Next step: find the right fabric!

Monday, June 4, 2012

If you want something done right...

I've been trying to find the perfect shelves for way too long. They just aren't popping up, so I've got my own plans in the works!

Patterned backing for shelves

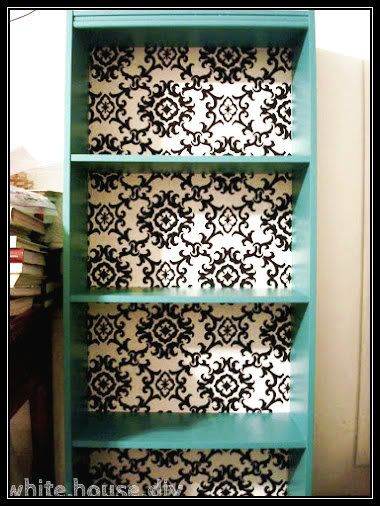
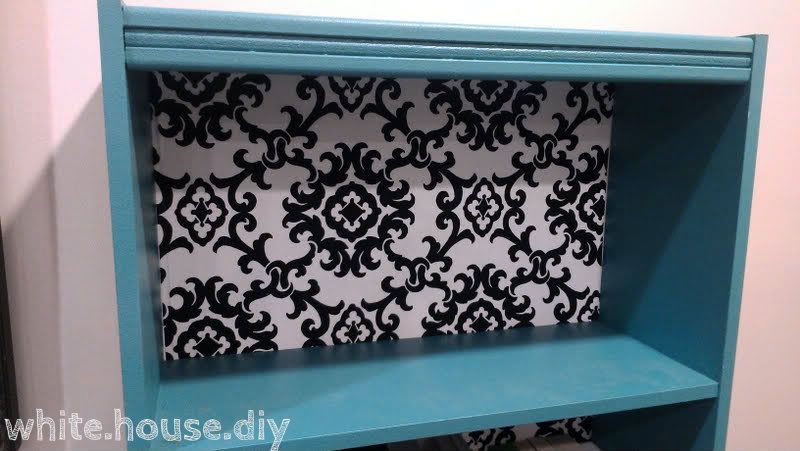
The summer after we got married, I decided that I wanted to make our apartment a little more presentable. Our place was what I would call "great for newlyweds", ie: small, cheap, and not inherently pretty. We had these two shelves that my in-laws gave us for free that were laminate and plywood. They worked just fine, but they also were not inherently pretty. Our stark white cinderblock space needed some colour, so I set out to Home Depot to find the perfect colour. After agonizing over it for a week, I finally decided on a great turquoise. It ended up looking a lot brighter in person, but I loved it.  I also found a great black and white damask canvas fabric at Joanns to use.
  
It was a really easy project, and I loved the result!
With the new apartment and changing things up, I have decided to part with my lovely shelves. I will miss them, but hopefully the next owner will like them as much as I do!
If you want to create your own shelves with a neat background, it's really easy!

Detach the backboard of your shelf. Cut a piece of fabric or wallpaper the same size as the board. Glue down using Mod Podge and let dry.
If you are painting your shelves, you just sand, prime, and paint a coat or two.  I'll go into more detail with that process in the future.
Staple or nail the board back onto the shelves, and you've got your lovely, updated shelves!

Sunday, June 3, 2012

Picking Colours

We just moved into a new apartment, so I've gotten the itch to redecorate things a bit.
One great way to choose colours is to take one item you really love-- such as a painting or upholstery fabric-- and pull colours and tones from that.  I've really been wanting to make a quilt that is the perfect size for napping (since naps are how I roll), so I'm trying to decide on fabrics to also pull furniture paint colours from.  The couch and the wall colours are already in place and won't be changed, so I'm also keeping those in mind.
There is an extremely handy tool that I love called {Chip It}.  You take an image and it pulls coordinating paint chip colours. You can use it with a picture of a room you like, the painting you want to hang, or in my case the fabrics I like for the quilt.
Here are the approximate wall and couch colours:


Here are the finalists (I think...) for the quilt and paint colours:
Tilly

Salt Air
Camp Modern

Garden Wall
I wouldn't incorporate all of the colours into large objects (I'm not liking some of those pinks), but overall, what do you think?

Which motif do you like the most?